Tags
Related Posts
Share This


Your Daily Bread
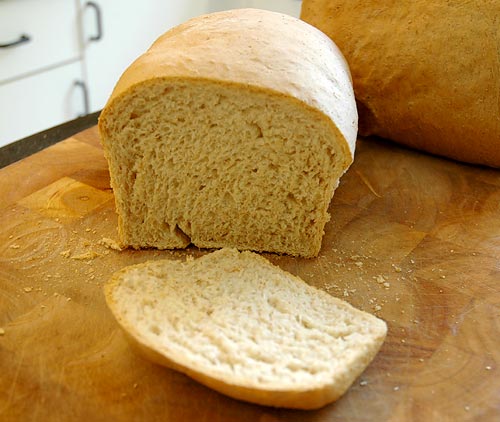
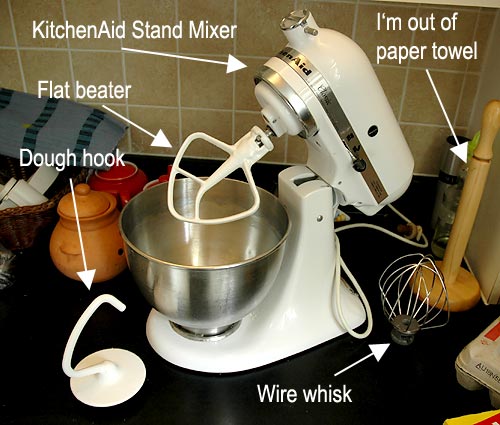
Alright, stop buying bread. Stop it right now. Dust off that KitchenAid mixer you got when you got married five years ago and whip out a dough blade. It’s time to make some freakin’ bread. Commercial bread blows. It really blows. It is flavourless, nutritionless garbage, to be be completely fair and polite. Making your own bread makes a loaf that is world’s better than the cardboard from the grocery store and once you’re in the habit of doing it two or three times a week, the world is your oyster. Want a hamburger? Make the buns yourself. A hot dog – do the bun yourself. Dinner roll? Italian loaf? Baguette? Foccacia? Bread stick? Do it all yourself. Here’s how I slap together my daily bread. See the notes at the end on how to modify the dough slightly for different results. A KitchenAid stand mixer really is pretty important with something like this. The kneading is back breaking work so let the machine do it while you sip $200-a-bottle wine.
Bread (pretty good title eh? I thought of it myself).
2 cups water
2 tablespoons sugar
2 heaping tablespoons dry active yeast
2 cups whole wheat flour
4 cups all purpose flour
1/4 cup butter, melted
1 heaping tablespoon of salt
First, we nuke. Fill your microwave-safe measuring cup with two cups of water and microwave until the temperature is between 110 F and 120 F. In my crappy old microwave that I got from Sears in 1990, it takes about a minute and 45 seconds. The water should be just about bath-water hot, or a little less. Get a thermometer and leave me alone already.
Now, add the sugar to the water and stir to dissolve. Sprinkle in the yeast and let it stand for 10 minutes to proof. It should be a nice foamy, liquid in that time. If the yeast didn’t do anything, sell your KitchenAid mixer on eBay. You’ll get $100 easy.
Add two cups of whole wheat flour and one cup of all purpose flour to the mixing bowl. Add the salt as well. Attach the flat beater and combine the flours. Add the yeast mixture and the butter to the flour in the bowl. At slow speed, combine until smooth for about two minutes. Begin slowly adding another cup of all-purpose flour as the machine runs slowly. Stop the machine, change to the dough hook, add another half cup of flour and start the machine on its lowest speed again. In small increments, continue adding flour until the total in there is around 5 and a half cups. By this time, you can increase the speed to the second setting and the dough should start to clean the sides of the bowl. Let it run (this is the kneading process that’s a mother by hand) for about 7 minutes, adding flour if the dough sticks to the bottom of the bowl at all. After about 7 minutes, stop the machine and remove the dough to a floured board. You’ll just need to knead it for a few seconds to smooth it out into a nice dough. Grease a big bowl (remember, the dough is going to double in size) with olive oil or butter and drop the dough in. Turn it to coat with the butter or oil and cover lightly with a tea towel. Let stand for two hours to rise. Remove it from the bowl and cut into two pieces. Knead each piece briefly, again just to smooth it and drop it into greased bread loaf pans. Again, turn to coat the dough with the butter or oil, then cover with the tea towel. Let it rise until they look like a loaf of bread should look like – this will take about 90 minutes to two hours. Preheat your oven to 375 F (350 F if it’s convection, the preferred type of oven, by the way). Put the loaves in and bake for 35 minutes. Turn the bread around halfway through cooking if you think your oven is uneven at all. Remove the loaves from the pans and let cool for 10 minutes before you dive in. Repeat three times a week for the rest of your life.
Notes:
• I use a mix of two cups of whole wheat flour to four cups of all-purpose flour for a nice all-purpose loaf of bread. Try experimenting with the mix to find the one you like best.
• If you’d like an Italian round loaf, just place the round of dough on a pizza pan to rise for two hours after you’ve cut the large dough in half instead of in the bread pans. Also, use extra virgin olive oil in place of the butter.
• I wanted to show this in a video demo but I suck at video. So there ya go.
Here’s my stand mixer, which I’ve used several times a week for the last five years:
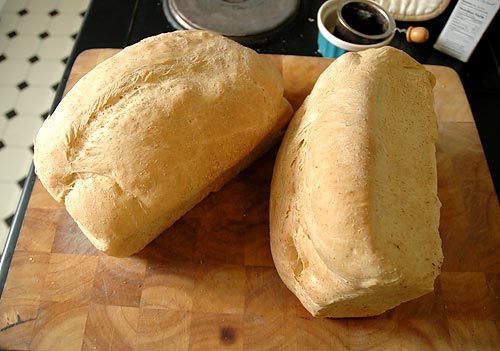
And here’s some more breed I just baked today. It’s easy – try it.
Thank you for this recipe! I wasn’t sure how to adapt bread recipes to my new Kitchenaid. I’m not the best cook and my husband loves fresh bread…. so I’m trying! I’ll let you know how this turns out. Again, thanks.
That’s awesome!!! I look for stand mixers for my wife.And how to choose it.Which brands is the best ?I saw many web about this but your web is the best for me.Thank you.
Did this yesterday and it worked great!
Oop! Yeah, start with the flat beater to get the initial mix going. It’ll make it nice and smooth and will actually do a lot to get the gluten in the dough working. You don’t need to switch to the dough hook until you’ve got a total of about four cups of flour in there. Do the same thing with pizza dough or any other dough as well. Flat beater!
Hawk – you never told me about using the flat beater and then the dough hook. I’ve been trying to use the dough hook the entire time and not getting the best results each time!